709-218-7927 The Landfall Garden House 60 Canon Bayley Road CANADA A0C 1B0 |
|
|---|
.JPG)
Vermicomposting in the cold-climate apartment - Performance
Continuous feed
There has to be a better way, especially when it comes to rotating the columns of 20-litre compost pails in the laundry closet. The oldest ones are always at the back .....
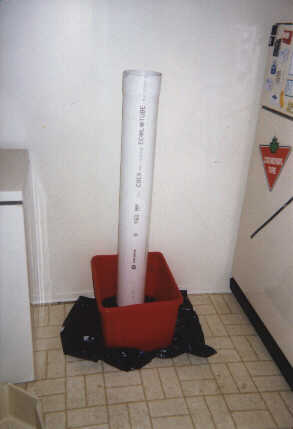
For $24 I can get a 10-foot length of six-inch diameter PVC sewer pipe from the builders-supply store. Being as I am, vertically challenged by nature I could saw it into three equal lengths and stand it vertically, well-bolted to the sides of a bin, with a gap of about four inches between the floor of the bin and the bottom of the 3'3" tube.
Paper, soil and vegetable and even meat waste goes in the top, Isaac Newton does his work, and composted soil flows out the bottom.
Worms hate light, and dryness, so as soon as they get near the base, they rocket upwards to where it is dark and warm and moist. I've got potting-ready worm-free soil coming at me from the bottom of three pipes. I can use one as an experiment ("Let's see if the little wrigglers can survive on just office paper"), and the other two as production lines.
The soil and waste gets mixed up and has plenty of time to mature on its downwards journey. I don't have to worry about riots as the worms in one pail realise they've got poorer food than worms in the other. Worms can migrate to where the food is most plentiful. They've got brains, just like the rest of us.
I'd probably use a simple wooden frame, so that both the top and bottom of each pipe is securely held upright. Vacuuming the best part of a 3' length of half-rotted breakfast debris would not be a pleasant task.
A pipe composter has to be less work than a series of pails, it seems to me.
I used the old Vermicomposter bin the city sold me for $10 a while back. Cut off 48 inches of pipe (I'm 5'6" tall and wanted to be left with some advantage!) and use three short and stubby woodscrews to screw through from the outside of the bin, into the tube, which I hold with a block of wood some three inches above the base of the bin. Self-tappers would be better, but then the washing-machine will fall apart.
Domestic continuous-feed model, using an original Vermicomposting bin
The whole thing is surprisingly stable. I thought I'd have to use a wooden brace, an L-shaped platform under the bin and a vertical to anchor the pipe, but at four feet, it doesn't seem too bad.
I have an option to drill two holes, as far apart as the diameter of the tube, up at the top edge of the bin. Strapping passes through the holes and around the tube, clamping the tube to the inside edge of the bin.
If you don't like the idea of a printed white sewer-pipe in your kitchen, paint it well with flat latex paint before you begin fixing it to the inside of the bin. You might also want to place an inverted basin below the tube to block the outfall of soil until the tube is filled. There's little to be gained from having fresh mixture drop down the tube and straight out at the bottom. I suppose a hinged or sliding door might be an idea.
Now I have a talus-slope of sieved soil at the base of the tube, starting to spread out across the base of the bin. Into the top of the tube goes the composter-pail I started a few days ago (phew!) and it gets topped off with today's garbage from the 1-litre sink-strainer and a few trowels of earth from the base of the tube.
That lot will settle over the next few hours, after which I'll be able to load a little more sieved soil from the other six pails - although maybe I'll leave them to finish maturing in the laundry closet.
Providing there is as little odor from the tower as there was from the pails, it'll be a treat to have the composter right in the kitchen. The footprint is so much less than the pail method.
I can just scoop a few trowels of composted soil from the bin and pop them back into the top of the tube.
Obtaining soil for potting will be as simple as dragging some soil from the base of the tower and giving the worms a head-start to retreat to darkness and safety.
Alternatively, with foresight, I can screw two self-tapping screws into the base of the tower some three inches up from the bottom rim, slide a plastic bag under the tube and hook the handles onto these "ears". When the next chunk of composted soil falls, it will be collected in the plastic bag.
Another arrangement is to cut out the base of the tube, leaving a "peg-leg" at the front to support the tube's weight.
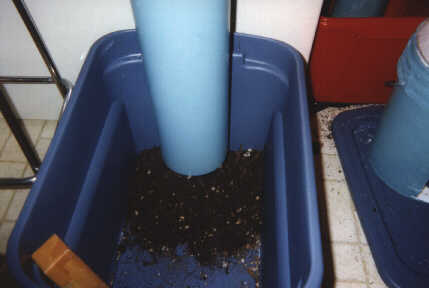
The domestic continuous feed model, showing some soil spilling from the base. The bottom of the sewer pipe is suspended about four inches above the floor of the bin. The bin was purchased for $CDN 7.
Advanced design
Yesterday I realized that a twin-tube model would be even better. There is space (laterally) on the wall of the bin for two tubes, and no extra space occupied on the floor, since the footprint is determined by the bin's area.
The first tube would be a primary digester. Office paper and the like. The second tube would receive output from the first - partially digested waste - plus kitchen waste. The wrigglers digest the kitchen waste so quickly.
|
Diam " |
Rad " |
Height" |
Area"" |
Volume""" |
|---|---|---|---|---|---|
Tube |
5.25 |
2.63 |
48.00 |
21.66 |
1,039 |
Pail |
10.25 |
5.13 |
14.00 |
82.55 |
1,155 |
Here's a sad truth. A four-foot pipe has about the same volume as a restaurant pail. In theory, I'd need eight lengths of sewer pipe to be as effective as eight pails in the laundry closet. I'd thought that the pipes would be more effective as they gave the worms a larger volume of material, and that they would go to the richest source, i.e. chomp away at the better waste before attacking the almost-completely digested waste.
Instead of having eight populations, some starving some pigging out, I figured that the pipe would provide a level playing-field. I've not expressed myself too well here. Truth is I'm disappointed that I didn't do my usual back-of- the-envelope calculation before expecting higher efficiency. I am still happy with the smaller footprint. Obviously (?!!) if I'd used a pipe twice the diameter I'd have four times the volume. I should start looking now for a twelve-inch pipe.
Monitoring flow
It's easy to monitor flow with the pails - the sachets on the side of each bin tell the date the bin was loaded and sent to mature. With the continuous-feed composter we use a series of plastic plates or discs, such as the lids of margarine containers, or even a small plastic bag tied into a ball.
Inside the bag place a slip of paper with today's date, and drop it on the top of the digester. When it appears at the other end, read the date to determine how long it took to pass through the tube.
Butterflies are two bread-bag tags - about a half-inch square, interlocked and nicked with today's date.
A suitable tube might be made by shedding the base of each pail, drilling four holes at ninety-degree intervals one-inch below the rim, setting cross-rods through the holes, and stacking pails within one another in that manner.
Bin towers
This is a melange of the individual pails and the continuous feed. We aim to get a bigger volume in a smaller footprint while maintaining the continuous feed. We build a tower of pails.
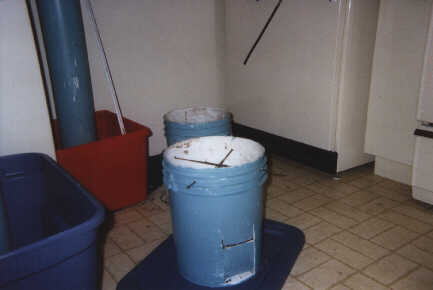
The bottom pail differs from all the other pails in two respects: (1) it has a doorway cut out of the base at one side. This door makes composted soil accessible; it needs to be large enough to trowel, and to scrape composted soil from the inside edges of the pail. About five inches square should do it. (2) it retains a base.
The base unit of the tower system. The drilled drainage holes are visible through the door. Cross wires are not yet in place
Detail of the base pail for a tower.
The plastic of the cutout door has been replace temporarily, and will remain their until the tower is primed, at which time the rectangle of plastic will be removed to allow flow of composted soil.
That said, prepare all other pails as follows: Remove the base of the pail except for a rim about one-inch wide. Soil will easily drop through the pail, except for a small amount which will catch on the ledge. The ledge serves to strengthen the bottom rim.
Drill four holes at ninety-degree intervals around the rim, exactly one inch from the top of the pail.
Pass two quarter-inch rods (or if you're really cheap, doubled- up wire coat-hangers) through these holes at right-angles, making a crude platform on which the upper bin can sit.
Detail of top of a tower pail
It is difficult to make out, but one of the two cross-wires can be seen turned up at the end outside the pail.
Place the first bin on an impervious mat, such as a tray or garbage bag. Load it half-full with soil (so as not to have raw garbage spewing out the doorway immediately!) and then top up with worms, soil and scraps.
When the first bin is full, place the second bin on top, resting it on the cross-rods of the first bin. Continue loading with soil, worms and scraps.
The base pail is assembled, the door is visible.
Some material has been added and the cross-wires are in place. The next bin, with its base almost completely removed, waits for its cross- wires.
Continue adding pails until your tower is complete. Now soil and worms can be recycled from the base to the top as wastes are added.
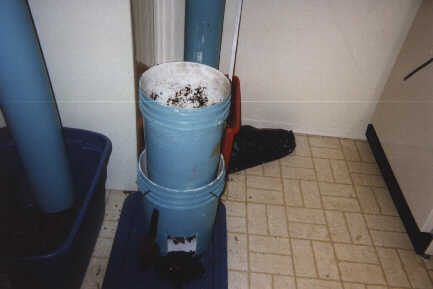
The second pail (more correctly, "tube") is set resting on the cross-wires of the first pail.
Excess soil falling out of the doorway will generally found to be free of worms, as they scurry inwards to escape the light. This soil is, therefore, directly suitable for pasteurizing and potting.
The bottom bin could have a shedding-platform made by fastening a plastic disc about half the diameter of the pail to a set of cross-rods halfway down the pail. Soil cascades off this platform down the sides of the pail and collects at the bottom, leaving an air-space above. Worms may not be able to escape this pile.
Even better, the rectangular section cut out for the door has a curved aspect corresponding to the curve of the bin cylinder. This can be bolted to the inside of the bottom bin, just above the opening, to deflect material towards the centre of the bin. This increase the tendency for material to drop down a central column, rather than to drain down the forward side of the tower.
Dismantling the tower is just as easily achieved as with the continuous-feed tube. We shovel mixture from the base into numbered supermarket plastic bags, dismantle and re-erect the tower, then reintroduce the material in composted sequence.
The tower can start with the simple base and new units added as pails are obtained, or as volume of waste rises.
If stability is thought to be a problem, four or five one-inch square timbers some six feet in length can be strapped around the outside of the pails, making a paling enclosure.
Loading
709 218 7927 CPRGreaves@gmail.com
Bonavista, Wednesday, June 03, 2020 12:27 PM
Copyright © 1996-2020 Chris Greaves. All Rights Reserved.